
Many users hesitate after buying outdoor wall lights because they worry installation is too complicated or requires a professional electrician. In reality, selecting lightweight aluminum models and following simple steps allows beginners to complete installation in under an hour. No specialized tools or advanced skills are required.
Lightweight aluminum outdoor wall lights, such as the aluminum outdoor wall lamp, are particularly suitable for DIY installation. Their minimal weight and simple structure reduce effort and make handling easier. This guide covers pre-installation preparation, step-by-step instructions, and common pitfalls for beginners.
Table of Contents
Why Installing Outdoor Wall Lights Isn’t as Hard as You Think
Newcomers often overestimate the difficulty due to unfamiliarity with the process or concerns about wiring safety. However, there are three reasons why installation can be surprisingly simple.
Aluminum and other lightweight outdoor wall lights usually weigh only 1–3 kilograms, significantly lighter than traditional iron models. Standard brick or concrete walls do not require extra reinforcement; self-tapping screws are sufficient to fix the fixture. Even users with limited strength can handle the installation easily.
Wiring is straightforward. LED outdoor wall lights typically use only three core wires: live (L), neutral (N), and ground (PE). Matching the wall wires by color—red or yellow for live, blue or black for neutral, yellow-green for ground—is all that’s needed. No complicated circuitry is involved.
High-quality outdoor wall lights come with all necessary accessories. Screws, connectors, instructions, and sometimes leveling stickers are included. This means beginners do not need to purchase additional tools or materials, allowing them to start installation immediately.
Pre-Installation Preparation: Ten Minutes to Safety and Tools
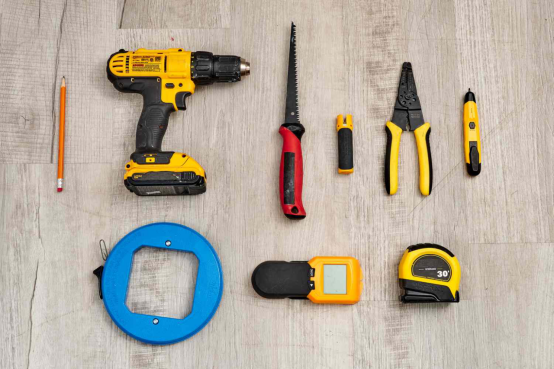
Before starting, complete three preparation steps to avoid confusion during installation.
Only four essential tools are needed. An electric drill with a 3mm bit is for drilling holes if the wall lacks a preinstalled base. A screwdriver set handles disassembly and screws. Wire strippers make exposing copper cores safer than using scissors. Finally, a voltage tester ensures that the power is off.
Safety checks are crucial. Turn off the circuit corresponding to the outdoor lighting at the main switch and test with a voltage tester. Check the wires for cracks or damage. If the wires are too short, use extension lines with waterproof connectors to maintain outdoor safety.
Product inspection ensures compatibility. Check that the lamp and accessories are intact and verify that the mounting hole spacing matches the wall base. Many aluminum models allow slight adjustments to fit different wall types.
Step-by-Step Installation: Five Easy Steps for Beginners
The first step is fixing the mounting plate. Mark screw positions on the wall with a pencil and use a level sticker to ensure alignment. Drill holes about 3cm deep, insert expansion tubes if necessary, and secure the plate with screws. Avoid overtightening to prevent deformation.
The second step is wiring. Open the junction box and strip approximately 1cm of insulation from each wire. Connect wall wires to lamp wires according to color codes. Use connectors rather than twisting wires and tape, especially in outdoor environments. Close the waterproof cover securely after connecting.
The third step is hanging the fixture. Align the lamp hooks with the mounting plate and gently slide the lamp into place. Confirm stability and, if necessary, add a non-slip pad. Always ensure the junction box cover is in place to prevent pressure on the wires.
The fourth step is securing the fixture. Tighten the side or bottom screws lightly to prevent wobbling. This step also enhances waterproofing by stabilizing the junction box and the lamp body.
The fifth step is testing. Restore power at the main switch and check that the lamp illuminates properly. Test additional features such as light sensors or motion detectors. If the lamp does not function, switch off and verify wire connections or consult the manufacturer for guidance.
Common Beginner Pitfalls to Avoid
Never attempt wiring with live electricity. Even if a voltage tester shows no current, double-check with a multimeter or wait a few minutes to ensure residual current is gone.
Always apply additional waterproofing. After securing the lamp, seal gaps between the fixture and wall with outdoor-grade silicone to prevent rainwater intrusion, especially in high-rainfall regions.
Pay attention to wall material. Standard screws may not hold in drywall or wood. Use appropriate anchors or screws designed for your wall type to ensure long-term fixture stability.
Summary: DIY Installation Is Simpler Than You Think
Installing outdoor wall lights is not difficult when you choose lightweight, fully-equipped models. Following the sequence of turning off power, fixing the mounting plate, wiring, hanging the lamp, and testing allows beginners to complete installation within an hour. Savings on electrician fees are an added benefit.
Focus on safety and follow each step carefully. With a reliable product like the aluminum outdoor wall lamp, beginners can enjoy a smooth installation process and the satisfaction of successfully installing their own outdoor lighting.